Last time, I introduced “How to make a grand piano”, but this time, I’m going to make a “printer (multifunction device)” with the LEGO bricks I have.
It’s easier to get the same block as much as possible, but it doesn’t have to be the same shape, so try to make it with the block at hand.
“Movies” and “Photos and descriptions” are available.
↓↓↓ YouTube
↓↓↓ Photo and Explanatory text.

First, align the blocks above.
OK if two blocks are combined to form the same shape. (Excluding some)

1) Attach “Plate 2 × 4” and “1 stud block 1 × 4”

2) Attach “Block 1 × 2” and “Slope 45 ° 2 × 2 screen” to the part made in No.1
3) Attach “Tile 1 × 4 Transgreen (Fluorescent)” to the top of “Block 1 × 2” and “Slope 45 ° 2 × 2 Screen”.
Transparent clear (transparent color), trans green (fluorescent yellow-green), and trans light blue are recommended because the transparent fluorescent color block is where the copy paper is placed.

4) Attach two “tile 1 × 2 grilles” to the unevenness on the side of “1 stud block 1 × 4”

5) Attach two “Plate 1 × 2” to “Plate 1 × 4”

6) Attach the red block “1 stud block 1×4” to the part made in No.3. * Any color can be used because this is the back side of the copy machine.
7) Attach two “Plate 1 × 2” to the uneven part on the side of the red block “Single side stud block 1 × 4”.
Two “plate 1 × 2” are the same size as “plate 1 × 4”, so if you have “plate 1 × 4” at hand, one is OK.

8) Attach “Plate 1 × 4” on top of red block “Single stud block 1 × 4”

9) Attach “Tile 1 × 4 Transgreen (Fluorescent)” to the top of the part made in No. 6.
10) Attach the No. 8 component to the No. 4 component.

Completion of the heart of the copier.
I’ll make a cartridge for inserting copy paper and a paper tray.

11) Attach 4 “Tile 1 × 2 Grill” to “Block 2 × 2”

12) Attach one “tile 1 × 2 grill” and two “tile 1 × 2 grills” to “reverse slope 45 ° 2 × 2”

13) Attach two “Plate 1 × 1 horizontal clips” to “Slope curve 2 × 2”

14) After making two 13th parts, attach “Plate 1×2 handle” to it

15) Arrange two 13th parts and attach “tile 2×2”
16) Attach “Tile 1 × 2” to “Plate 1 × 2 handle” (photo red circle)

17) Attach two “Tile 1 × 1 clips” to “Bracket 1 × 2/2 × 2”. * Note the direction
18) Attach the part made with No. 16 to the No. 17 clip
19) Attach “Tile 1 × 2” to “Bracket 1 × 2/2 × 2”

20) Attach the No. 19 part and the “Bracket 1 × 2/2 × 2” to the part made at No. 15.
21) Attach the parts made in Nos. 11 and 12 next to the parts made in No. 20 (left photo)

21) Attach the parts made in Nos. 11 and 12 next to the parts made in No. 20 (left photo)


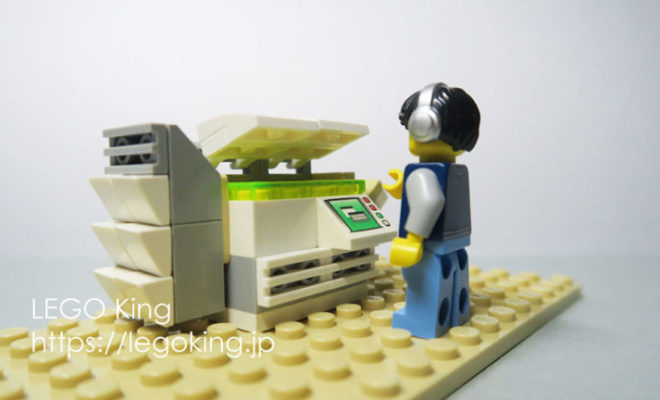
Completion of copy machine (multifunction machine)! ! !


It would be nice if you put the minifigure in front of the copy machine, right? !


この記事へのコメントはありません。